A cluttered kitchen can turn meal prep into a nightmare. If you’re struggling with limited cabinet space or awkward corners, adding a sliding basket to your kitchen run is a game-changer. These versatile storage solutions maximize vertical space, improve accessibility, and keep utensils, التوابل, or pantry items within easy reach. في هذا الدليل, we’ll walk you through installing a kitchen sliding basket while covering tips to choose the right hardware, avoid common mistakes, and optimize your kitchen workflow.

Why Add a Sliding Basket to Your Kitchen Cabinets?
Sliding baskets (also called pull-out baskets or sliding drawer organizers) are essential for modern kitchen organization. Here’s why they’re worth the investment:
- تعظيم كفاءة التخزين: Turn deep cabinets into functional space with smooth-gliding racks.
- Ergonomic Access: No more crouching or digging through stacks—items slide out effortlessly.
- Customizable Layouts: Adjustable dividers let you organize pots, المقالي, or snacks.
- البناء الدائم: High-quality stainless steel or coated wire ensures longevity.
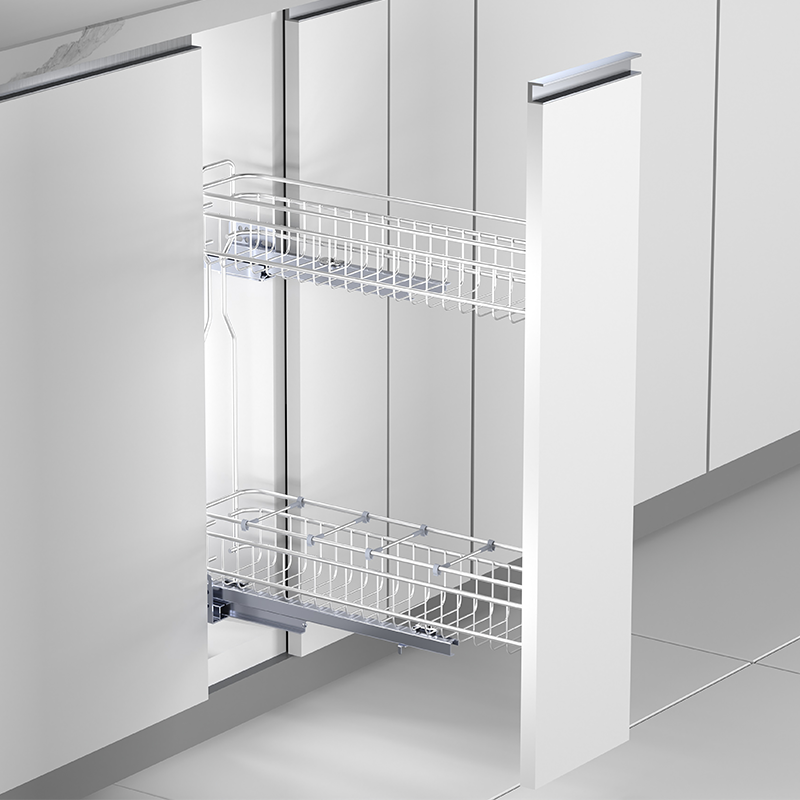
خطوة 1: Choose the Right Sliding Basket for Your Kitchen
Not all sliding baskets are created equal. Consider these factors:
- مادة: اختر stainless steel sliding baskets for durability or coated wire for lightweight items.
- مقاس: Measure your cabinet’s height, عرض, والعمق. Standard sizes range from 12” to 24” wide.
- قدرة الوزن: Heavy-duty models (20+ رطل) suit pots; lighter ones work for spices or cutlery.
- آلية الشريحة: Full-extension soft-close slides ensure smooth operation and quiet use.
خطوة 2: Prep Your Cabinets for Installation
Before mounting your sliding basket, ensure your cabinet is ready:
- Empty the Cabinet: Remove all items and shelves.
- Check for Obstructions: Look for pipes, مسامير, or uneven surfaces.
- Reinforce Weak Spots: Use plywood panels if the cabinet walls are thin.
خطوة 3: Install the Sliding Basket Rails
Most sliding baskets attach to side-mounted rails. وإليك كيف:
- Mark the Rail Position: Use a مستوى to mark where the rails will sit (typically 1-2” below the cabinet top).
- Drill Pilot Holes: Prevent wood splitting by pre-drilling holes.
- Secure the Rails: Screw the rails into place, ensuring they’re parallel.
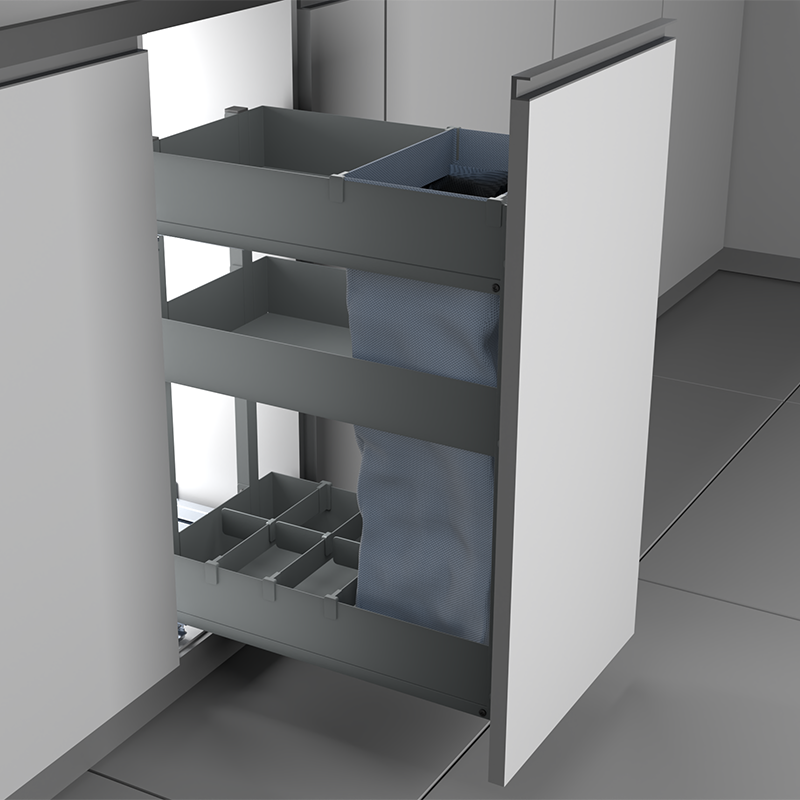
خطوة 4: Attach the Basket and Test
Once the rails are fixed:
- Snap the Basket onto the Rails: Most systems click into place.
- Test the Movement: Pull the basket out fully—it should glide smoothly without wobbling.
- Adjust if Needed: Tighten screws or reposition rails for alignment.

Creative Uses for Sliding Basket in Your Kitchen
Don’t limit sliding baskets to pots and pans! Try these ideas:
- Spice Racks: Install narrow baskets near the stove for easy seasoning access.
- Trash or Recycling Pull-Outs: Hide bins in lower cabinets.
- Vertical Pan Storage: Use tall baskets for baking sheets and cutting boards.
Maintenance Tips for Long-Lasting Sliding Basket
- Clean Regularly: Wipe down wire baskets with a damp cloth to prevent grease buildup.
- Lubricate Slides: يتقدم silicone spray to rails annually for quiet operation.
- تجنب التحميل الزائد: Stick to the weight limit to prevent sagging.
خاتمة
Adding a sliding basket to your kitchen run is a simple upgrade with big rewards. By optimizing cabinet space and reducing clutter, you’ll create a kitchen that’s both functional and enjoyable to use. Whether you’re a meal-prep pro or a casual cook, this project delivers lasting value.