어수선한 주방은 식사 준비를 악몽으로 만들 수 있습니다. 제한된 캐비닛 공간이나 불편한 모서리로 인해 어려움을 겪고 계시다면, 주방에 슬라이딩 바구니를 추가하면 게임의 판도가 바뀔 것입니다.. 이러한 다용도 스토리지 솔루션은 수직 공간을 극대화합니다., 접근성 향상, 그리고 기구를 보관하세요, 향료, 또는 쉽게 닿을 수 있는 식료품 저장실 품목. 이 가이드에서는, 설치 과정을 안내해 드리겠습니다. 주방 슬라이딩 바구니 올바른 하드웨어를 선택하기 위한 팁을 다루면서, 일반적인 실수를 피하십시오, 주방 작업 흐름을 최적화하고.

주방 수납장에 슬라이딩 바구니를 추가하는 이유?
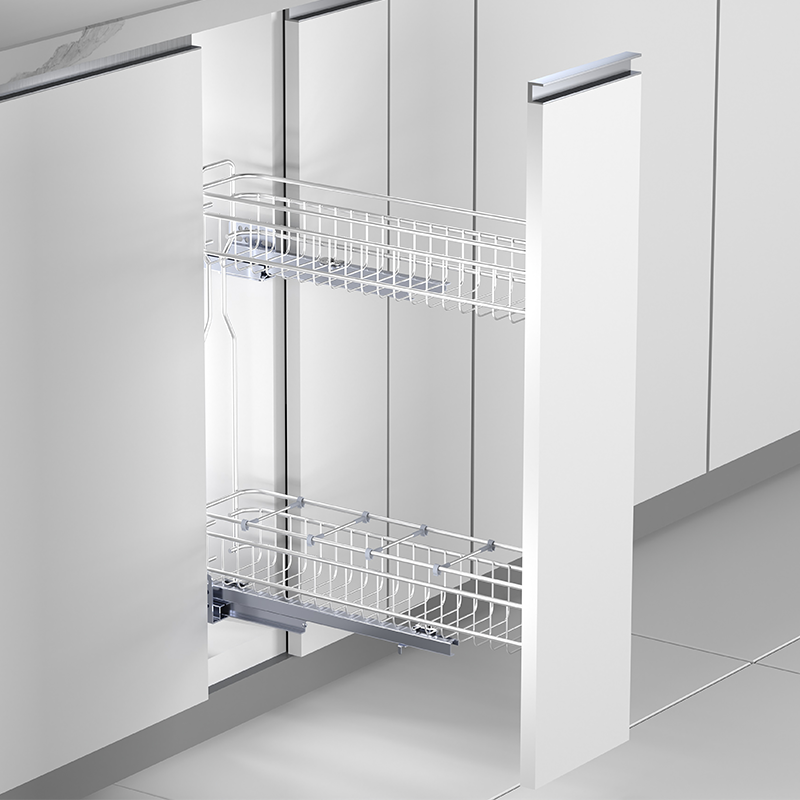
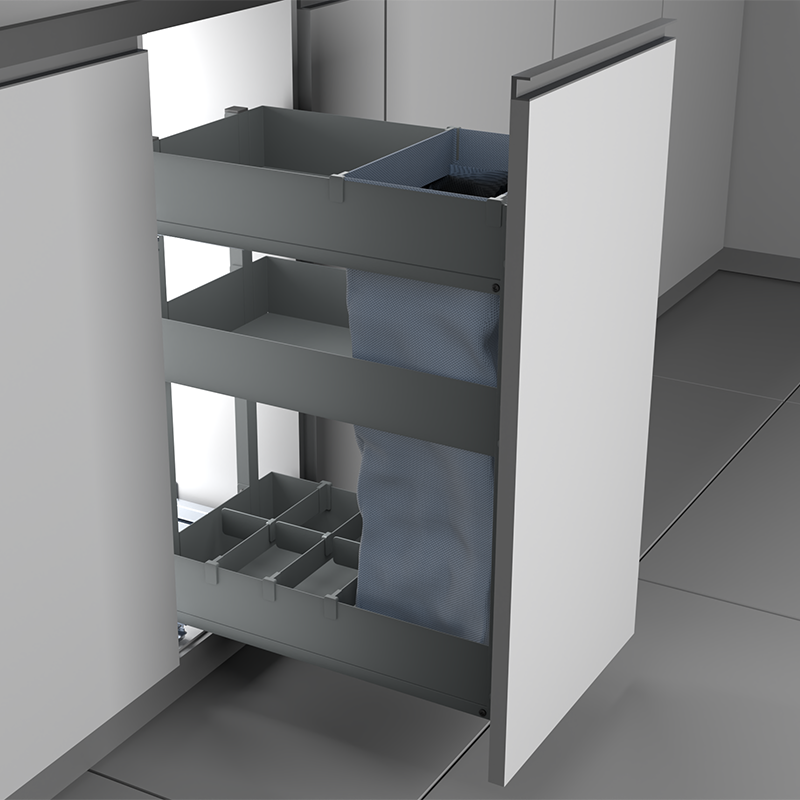
슬라이딩 바구니 (풀아웃 바스켓 또는 슬라이딩 서랍 정리함) 현대적인 주방 조직에 필수적입니다.. 투자할 가치가 있는 이유는 다음과 같습니다.:
- 스토리지 효율성 극대화: 부드럽게 미끄러지는 랙을 사용하여 깊은 캐비닛을 기능적인 공간으로 바꾸세요..
- 인체공학적 접근: 더 이상 웅크리거나 더미를 뒤질 필요가 없습니다. 항목이 쉽게 미끄러져 나옵니다..
- 맞춤형 레이아웃: 조절 가능한 칸막이로 화분을 정리할 수 있습니다., 팬, 아니면 간식.
- 내구성 있는 구조: 고품질 스테인리스 스틸 또는 코팅 와이어로 수명 보장.
단계 1: 주방에 딱 맞는 슬라이딩 바구니를 선택하세요
모든 슬라이딩 바스켓이 동일하게 생성되는 것은 아닙니다.. 다음 요소를 고려하십시오.:
- 재료: 선택하다 스테인레스 스틸 슬라이딩 바구니 내구성을 위한 와이어 또는 경량 품목을 위한 코팅 와이어.
- 크기: 캐비닛 높이를 측정하세요, 너비, 그리고 깊이. 표준 크기 범위는 12인치부터 24인치까지입니다..
- 체중 용량: 헤비듀티 모델 (20+ 파운드) 정장 냄비; 가벼운 것들은 향신료나 식기류에 사용됩니다.
- 슬라이드 메커니즘: 완전 확장형 부드럽게 닫히는 슬라이드는 부드러운 작동과 조용한 사용을 보장합니다..
단계 2: 설치를 위해 캐비닛 준비
슬라이딩 바스켓을 장착하기 전에, 캐비닛이 준비되었는지 확인하세요:
- 캐비닛 비우기: 모든 품목 및 선반 제거.
- 장애물 확인: 파이프를 찾아보세요, 나사, 또는 고르지 않은 표면.
- 약점을 강화하라: 캐비닛 벽이 얇은 경우 합판 패널을 사용하십시오..
단계 3: 슬라이딩 바구니 레일 설치
대부분의 슬라이딩 바스켓은 측면 장착 레일에 부착됩니다.. 방법은 다음과 같습니다:
- 레일 위치 표시: 사용 수준 레일이 놓일 위치를 표시하기 위해 (일반적으로 캐비닛 상단 아래 1-2인치).
- 드릴 파일럿 홀: 구멍을 미리 뚫어 목재가 쪼개지는 것을 방지합니다..
- 레일을 확보하세요: 레일을 제자리에 나사로 고정하세요, 평행한지 확인.
단계 4: 바구니 부착 및 테스트
레일이 고정되면:
- 바구니를 레일에 끼우세요: 대부분의 시스템은 제자리에 고정됩니다..
- 무브먼트 테스트: 바구니를 완전히 당겨서 빼내십시오. 흔들리지 않고 부드럽게 미끄러져야 합니다..
- 필요한 경우 조정: 정렬을 위해 나사를 조이거나 레일 위치를 조정하세요..

부엌에서 슬라이딩 바구니를 창의적으로 활용하는 방법
슬라이딩 바구니를 냄비와 프라이팬으로 제한하지 마세요! 이 아이디어를 시도해 보세요:
- 향신료 선반: 양념에 쉽게 접근할 수 있도록 스토브 근처에 좁은 바구니를 설치하세요..
- 쓰레기 또는 재활용품 풀아웃: 하단 캐비닛에 휴지통 숨기기.
- 수직 팬 보관: 베이킹 시트와 도마에는 키가 큰 바구니를 사용하세요..
오래 지속되는 슬라이딩 바구니에 대한 유지 관리 팁
- 정기적으로 청소하세요: 기름이 쌓이는 것을 방지하기 위해 젖은 천으로 철망 바구니를 닦아냅니다..
- 슬라이드 윤활: 적용하다 실리콘 스프레이 조용한 작동을 위해 매년 레일에 설치.
- 과부하 방지: 처짐을 방지하려면 무게 제한을 준수하십시오..
결론
주방 운영에 슬라이딩 바구니를 추가하면 큰 보상을 받을 수 있는 간단한 업그레이드가 가능합니다.. 캐비닛 공간을 최적화하고 혼잡함을 줄임으로써, 기능적이고 사용하기 즐거운 주방을 만들 수 있습니다. 당신이 식사 준비 전문가이든 일반 요리사이든 상관없습니다., 이 프로젝트는 지속적인 가치를 제공합니다.